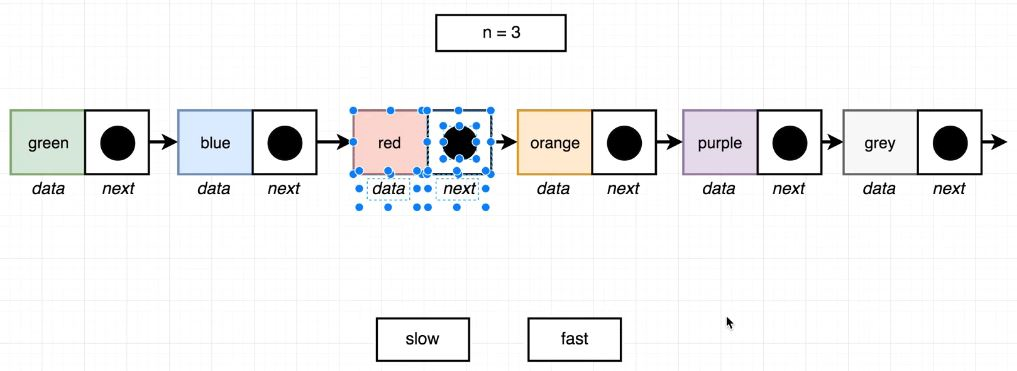
Q. Linked Lists의 마지막 Node에서 n번째 앞에 Node를 반환하는 function을 작성하라.
---Examples; const list = new List(); list.insertLast('a'); list.insertLast('b'); list.insertLast('c'); list.insertLast('d'); fromLast(list, 2).data; // 'b'
🎈첫 번째에서부터 다음 n번째 Node와, 마지막에서부터 앞으로 n번째 Node의 간격은 같다. 생각의 전환! 을 생각하면 조금 더 쉽게 풀어나갈 수 있다.
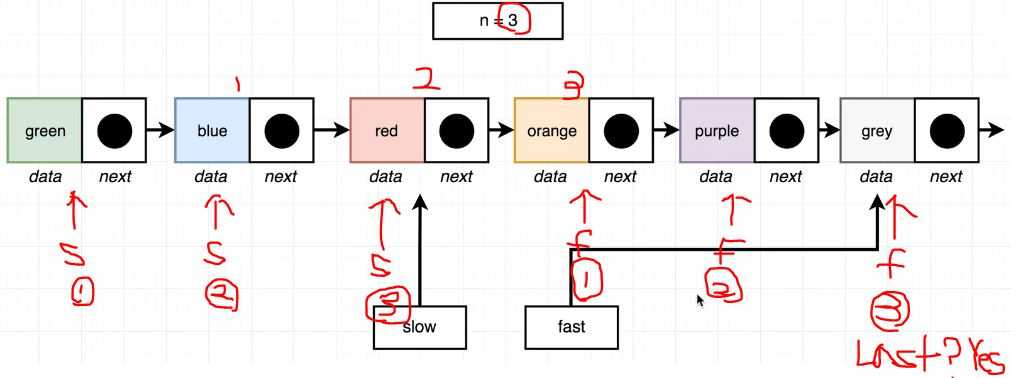
From Last 힌트 및 이미지화
🧨 역시나 앞서 풀었던 2문제들과 비슷하다. 하지만, 생각을 조금 다르게 해야한다. 뒤에서부터 3번 앞으로 이동하면 red Node이며, 마지막 Node는 grey이고, 간격은 3이다. 앞에서부터 3번 뒤로 이동하면 orange Node이며, 첫 번째 Node는 green이고, 간격은 3이다.
만약, slow와 fast가 시작점(green)에서 시작할 때, fast를 먼저 3번 앞으로 이동해보자. 그럼 fast는 orange를 만난다. slow는 시작점인 green을 가리키고 있다. 이제 fast가 끝(grey)에 도달할 때까지, slow와 fast를 1칸씩 이동해보자. slow는 최종적으로 red를 가리키게 된다.
즉, 앞에서 이동하나 뒤에서 이동하나 그 간격은 같다. Node를 각각 반대로 생각하면 된다. 결과적으로, fast는 마지막 node를, slow는 뒤에서부터 n번째 떨어진 node를 의미하게 된다.
이렇게 뒤에서 앞에 n번째 값을 구할 수 있다.
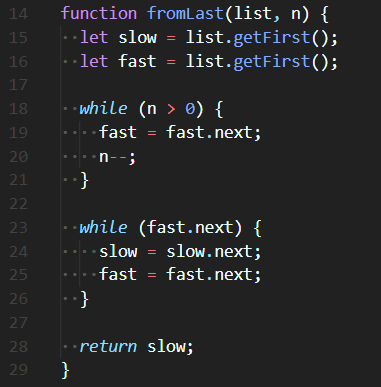
slow와 fast 진행도From Last 정답 코드
🔮 while loop을 이용해 fast를 n만큼 이동시켜주고, 또 다시 while loop을 이용해 slow와 fast를 이동시켜준다. 결과적으로 slow는 뒤에서 n번째 Node를 가리키게 된다.
Q. Linked Lists가 circular인지 확인하라(마지막 Node가 없고, 계속 순환하는 Linked List). (맞다면 true, 아니라면 false를 반환)
--- Examples const l = new List(); const a = new Node('a'); const b = new Node('b'); const c = new Node('c'); l.head = a; a.next = b; b.next = c; c.next = b; circular(l) // true
🎈 토끼와 거북이가 운동장 돌기 경주를 하는데, 경주의 끝이 없다면, 언젠가는 둘이 만날(겹칠) 것이다. 라고 상상하면 조금 더 쉽게 풀어나갈 수 있다.
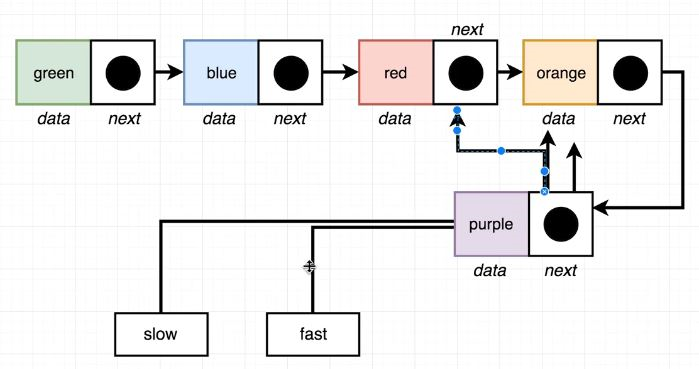
Check Linked List Circular 힌트 및 이미지화
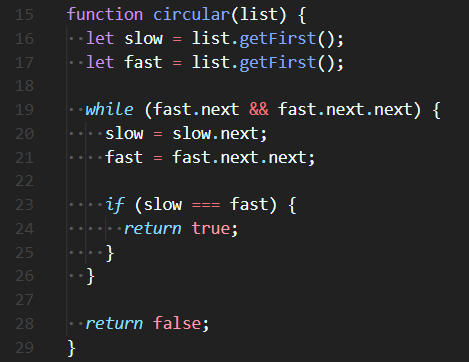
🧨 앞서 풀었던 Find the Midpoint 문제를 응용하면 된다. slow와 fast의 시작점은 같고, slow는 1칸, fast는 2칸씩 이동한다. 계속 이동하다보면 slow === fast가 되는 경우가 발생할 것이고, 이걸 조건문으로 넣어 true를 return하면 된다. 만약, circular가 아니라면 while loop조건 fast.next.next를 만족하지 않으므로 while loop이 끝난 후 false를 return하면 된다.
Check Linked List Circular 정답
🔮 while loop안에서 slow === fast 조건을 넣어주고, true가 반환된다면 이 Linked List는 Circular(순환)이며, while loop의 조건인 fast.next.next를 만족시키지 못한다면 끝이 있는 Linked List이므로 Circular가 아니다.
Q. Linked Lists의 중간 Node를 찾는 function을 구현하라. (매개변수로 list를 받으며, Lists의 크기가 짝수라면, Lists 반의 앞 부분에서 마지막 Node를 반환하고, counter변수나 size() method를 사용하지 않고 풀어야 한다)
🎈 토끼와 거북이의 경주를 생각해보자. 토끼가 거북이의 2배 속도로 달린다고 생각할 때, 토끼가 도착하면 거북이는 중간을 달리고 있을 것이다.
토끼 변수1, 거북이 변수1, 달리기 반복 loop을 이용해서 문제를 해결해보자.
Find the Midpoint 힌트 및 이미지화
🧨 slow와 fast변수는 같은 시작점에서 출발한다. 그리고 slow는 1칸씩, fast는 2칸씩 이동한다. Lists 크기가 홀수일 경우를 먼저 생각해보자. fast가 2칸씩 이동했을 경우, 항상 마지막 Node에 도착할 수 있고, 그때 slow의 위치는 중간이다. 하지만, Lists의 크기가 짝수일 경우에는 fast가 마지막 Node에 도착할 수 없다. 따라서, fast의 다음 칸은 있지만, 다음 다음 칸을 확인했을 때 Node가 없다면, 그때 slow의 위치는 중간(즉, Lists 전체 크기에서 반을 잘랐을 때 앞부분 반의 마지막 Node)이다.
위의 내용을 아래 코드로 옮겨 보았다.
정답 코드
🔮 slow나 fast를 초기화할 때, list.head;를 사용해도 동일하며, while의 조건은 반드시 &&(and)로 넣어줘야 한다.
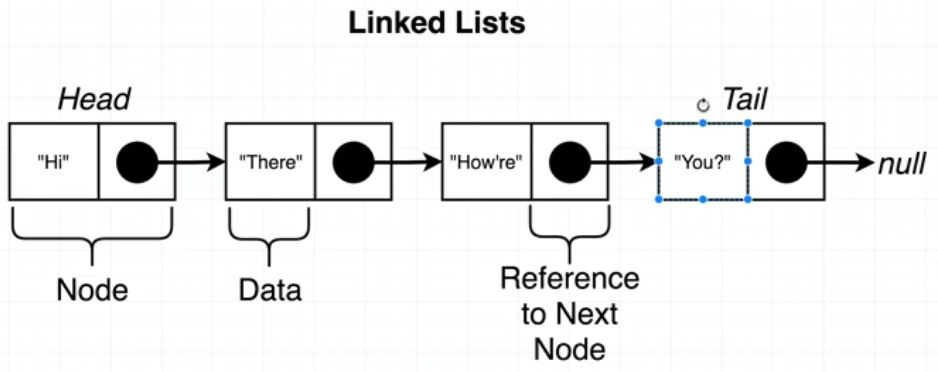
🎈 위 그림에서 볼 수 있듯, Linked List는 기본적으로 Node와 Head(or Tail까지)로 구성되어 있다. Node는 Data와 Next로 구성되어 있는데, Data는 해당 노드의 데이터 Next는 다음 Node를 가리키는 Reference를 가지고 있다. 그리고 Linked List의 맨 앞 Node는 Head가 가리키며, 맨 끝 Node는 Tail이 가리키고 있다.
Linked Lists의 method는 만들기 나름이지만, 이 글에서는 insertFirst(data), size(), getFirst(), getLast(), clear(), removeFirst(), removeLast(), insertLast(data), getAt(index), removeAt(index), insertAt(data, index) 를 다뤄볼 것이다.
JavaScript의 class를 이용하여 Node와 Linked List를 만들어보겠다.
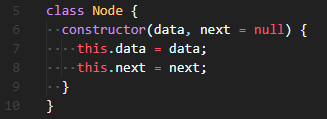
Node class
😐 Node class는 위처럼 data, next로 구성했다. next는 값이 언제 들어올지 모르므로 default 설정해준다. (default가 궁금하다면 JavaScript - ES2015를 참고해주세요)
Linked List class 1
😐 Linked List의 constructor()는 head만 선언해주었다. this.head의 시작은 항상 null.
insertFirst() method는 가장 첫 번째 list에 Node를 생성해 준다. 가장 첫 번째 List에 넣어줘야하므로, this.head에 Node를 생성해준다. 기존에 첫 번째 값이 존재할 수 있으므로, next에는 this.head를 넣어줘서, 이전에 this.head가 가리키고 있던 (과거)첫 번째 노드를 새로 만든 첫 번째 Node가 가리킬 수 있도록 reference를 재설정해준다.
size() method는 list의 크기를 알려준다. while loop을 이용해 node를 끝까지 탐색하게 해주고, node를 이동할 때마다 counter를 1개씩 증가시켜주면 된다.
getFirst() method는 list의 첫 번째 node를 반환한다. 간단하게, this.head를 반환해주면 된다. 만약 list가 비어있다면 null이 반환될 것이다.
getLast() method는 list의 마지막 node를 반환한다. if 조건문을 이용해, list가 비어있다면 null을 반환해준다. 비어있지 않다면, while loop을 이용해 node를 끝까지 탐색하여 마지막 node를 반환해준다. 여기서 중요한 것은 while loop안에 if 조건문으로, 탐색중인 node의 다음 node가 없다면, 해당 node가 마지막이므로 바로 반환할 수 있도록 작성해주는 것이다.
clear() method는 list를 초기화한다. this.head = null;을 작성해주면 간단하게 해결할 수 있다.
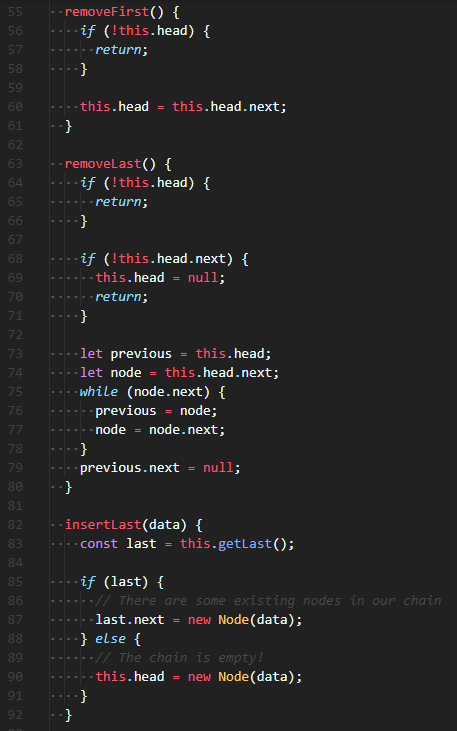
Linked List class 2
removeFirst() method는 가장 첫 번째 node를 제거해준다. this.head는 첫 번째 node를 가리키고 있고, this.head.next는 두 번째 node를 가리키고 있다. 따라서, this.head에 두 번째 노드인 this.head.next를 넣어주면, 첫 번째 노드는 제거된다. (list 그림을 상상해야한다. head가 첫 번째 노드를 가리키다가, 두 번째 노드를 가리킨다고 생각하면 된다)
removeLast() method는 가장 마지막 node를 제거해준다. list가 비어있을 경우, list에 node가 하나일 경우를 먼저 조건문으로 처리해줘야 한다. (previous와 node를 사용할 것이므로 적어도 node가 2개 이상 돼야 한다.) 탐색을 하기 전에, 제거할 node의 이전 node를 가리키는 previous, 제거할 node인 node를 선언해준다. while loop안에서 지금까지 해왔던 탐색과 마찬가지로 node를 이용해 마지막 node를 찾은 후, previous.next에 null을 넣어줘서 마지막 node를 제거해준다.
insertLast(data) method는 list의 가장 마지막에 node를 생성해 준다. 직접 작성해줄 수도 있겠지만, 여기서 이전에 작성한 method를 재사용해줄 수 있다. 바로 getLast() method다. 마지막 node를 찾아줄 getLast()를 사용하고, 만약 last가 있다면 last의 다음에 node를 생성해주고, 만약 last가 없다면 list가 비었다는 것이므로, this.head에 node를 생성해주면 된다.
Linked List class 3
getAt(index) method는 원하는 index의 node를 찾아준다. size() method를 작성할 때와 비슷하게, counter를 선언해주고 while loop을 이용해 탐색한다. while loop 안에서 if 조건문을 이용해 만약 index와 counter가 같다면 해당 node를 반환해준다. while loop 안에서 못 찾았다면, index값이 list의 개수를 벗어나거나, list가 비어있는 것이므로 null을 return해준다.
removeAt(index) method는 해당 index의 node를 제거해준다. 해당 node를 제거하려면 이전 node도 알아야하기 때문에 적어도 node가 2개 이상이어야 한다. 따라서 list가 비어있을 경우와 list에 node가 1개만 있을 경우를 조건문으로 처리해준다. 그리고 여기서도 기존 method를 재사용할 수 있다. 바로 this.getAt(index)이다. this.getAt(index-1)을 이용해 previous를 찾아내고, previous가 탐색 범위가 넘어갔을 경우를 조건문으로 처리해준다. !previous는 아예 범위가 벗어난 경우, !previous.next는 previous는 찾아냈지만, previous가 마지막 node인 경우다. 만약 위의 조건문에 걸리지 않는다면, 정상적으로 해당 node 제거가 가능하다는 것이므로, previous.next에 previous.next.next를 넣어준다. 이렇게 처리해주면, previous와 previous.next.next 사이에 있던 node를 제거할 수 있다.
insertAt(data, index) method는 해당 index에 node를 생성해준다. 여기서도 해당 index의 이전 node를 가리키는 previous를 사용해줘야 하기 때문에, list가 비어있을 경우, list에 node가 1개만 있을 경우를 조건문으로 처리해준다. 이전과 다르게, 위의 조건문에 걸렸을 경우에는 바로 node를 생성해주고 return한다. 여기서는 2개의 기존 method를 재사용해줄 수 있다. 바로 getAt()과 getLast()이다. getLast()를 사용하면 insertAt에 list의 범위를 넘어간 index를 넣었을 때, list의 가장 마지막에 node를 생성해줄 수 있다. previous.next를 가리키는 node를 생성해주고, previous.next에 새로운 node를 넣어주면 된다. (머릿속으로 Linked List이미지를 상상하자)
🎉 위의 방법으로 JavaScript를 이용해 Linked List를 작성해줄 수 있다. 다음 글에서는 Linked List를 이용한 Algorithm들을 살펴보겠다.
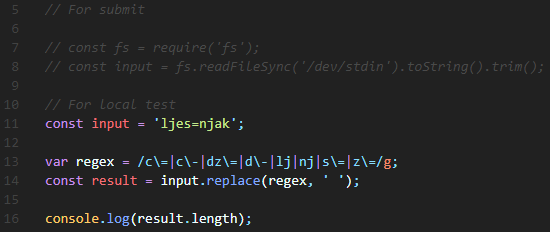
😢 단순 조건문 처리로는 풀기 싫어서, 어렵게 풀려다가 생각하는 시간이 조금 걸렸다. 그리고 문제를 보자마자 Regular Expression이 떠올라서, RegExp로 풀려고 공부를 조금 했다.
😊 조건문으로만 풀기에는 뭔가 문제가 아까웠다. 그래서 이런 방법 저런 방법을 시도해봤다. (물론 단순 조건으로도 풀어봤다)
regex변수에 크로아티아 알파벳 조건들을 입력해주고 replace() 에 주입하여, 만약 일치하는 것이 있다면 공백(' ')으로 만들어줬다. RegExp 구성을 살펴보겠다. 아주 간단하다. =, -와 같은 문자들은 특수문자이기 때문에 특별하다는 뜻으로 \(backslash, escape라고도 부른다)를 앞에 붙여줘야 하고, 그 외 조건들은 |(or)문자를 사용해서 구분해주었고, g를 붙여 Global search를 해줬다.
결과적으로 2개 이상 문자를 갖는 크로아티아 알파벳은 공백으로 변경되어 1개의 문자를 갖게 된다. 따라서 결과의 length를 출력해주면 크로아티아알파벳의 개수를 알 수 있다. (조건 외의 알파벳은 1개로 치니까 따로 처리하지 않는다)
Full Code에 단순 조건문 처리로 푼 예제도 있으니 참고하길 바란다.
✔ String.prototype.replce()
크로아티아 알파벳만의 조건을 넣어서, 공백(' ')으로 변경해주기 위해 사용했다.
✔ Regular Expressions
문자열을 다루기 위한 정규표현식이다. 크로아티아 알파벳 조건을 표현하기 위해 사용하였다.
위의 Skill들은 JavaScript - helper methods 카테고리에서 간단한 사용방법을 확인할 수 있다.
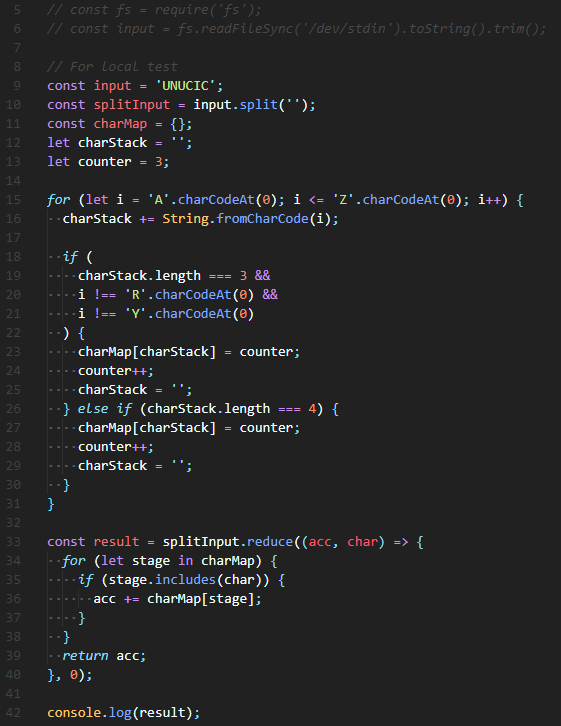
😢 알파벳을 직접 손으로 입력하고 싶지 않았고, Object로 value(각 지연 시간)까지 넣어서 진행하고 싶었다. 큰 어려움은 없었고, 중심을 Object로 만들고 푸는 과정에서 어떻게 진행할지 조금 고민했다.
😊 'A'부터 'Z'까지 진행하는 for loop을 열고, 'PQRS', 'WXYZ'는 예외로 들어가도록 조건문을 걸어주었다. ( i !== 'R'charCodeAt(0) && i !== 'Y'.charCodeAt(0) )으로 조건을 넣어준 이유는, 'PQRS', 'WXYZ' 이 2가지만 제외하면 모두 길이가 3이다. 그래서 길이 3으로 저장되기 전인 R or Y에서 저장을 차단하고, 앞의 두 문자가 각각 합쳐져 길이가 4가 되었을 때 key로 저장되도록 했다.
Object를 만들어준 후에, 입력 받고 split('')한 값에 reduce달았고, 안에 Object를 반복하는 for ... in loop을 열어주었다. 그렇게 입력받은 값 중에 각 key에 해당하는 문자가 있다면, acc에 해당 key의 value를 중복 저장해주고 return 해주었다. 결과적으로 result값에 전화를 걸기 위해 필요한 시간이 저장된다.
다른 풀이도 확인해보았지만, 대부분 직접 알파벳을 입력해서 사용하였고, 특별히 다른 점을 찾지 못 했다.
✔ Object {}
{ 'ABC' : 3, 'DEF': 4 ... } 이런 식으로 전체 알파벳을 저장하기 위해 작성하였다.
✔ charCodeAt()
해당 알파벳의 ASCII Code(숫자)를 알아내서 for loop을 이용하기 위해 사용하였다.