728x90

Q. 이진 트리 구조의 Node class를 작성하고, insert(삽입), contains(검색) method를 추가하라.
(생성자(constructor)는 data, left, right를 초기화 해야하며, insert()와 contains()는 data를 argument로 받는다.
또한, contains()는 해당 Node를 반환하거나 조건에 맞지 않는다면 null을 반환해야 한다.)

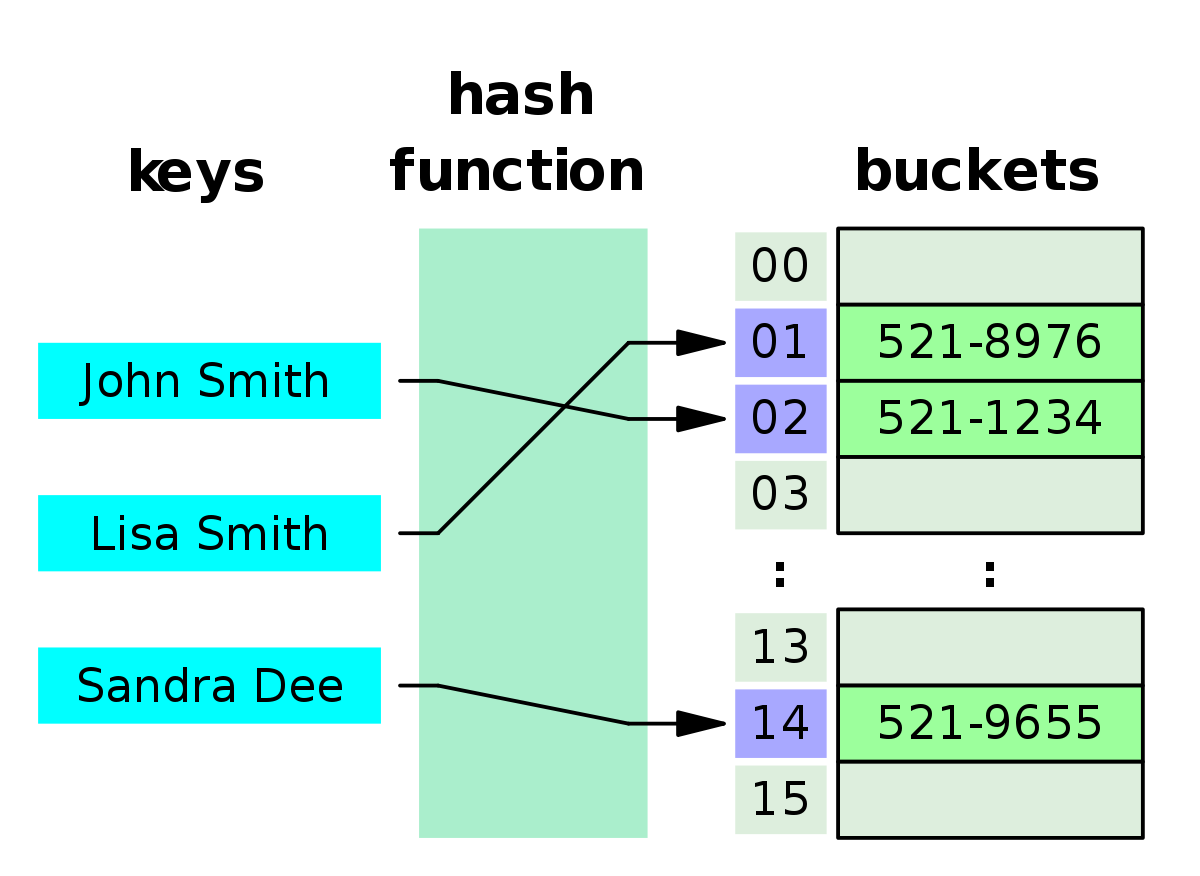
이진 탐색 트리의 정의(Definition of Binary Search Tree)

이진 트리 탐색 이미지화

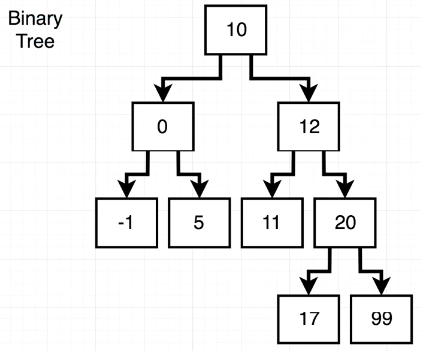
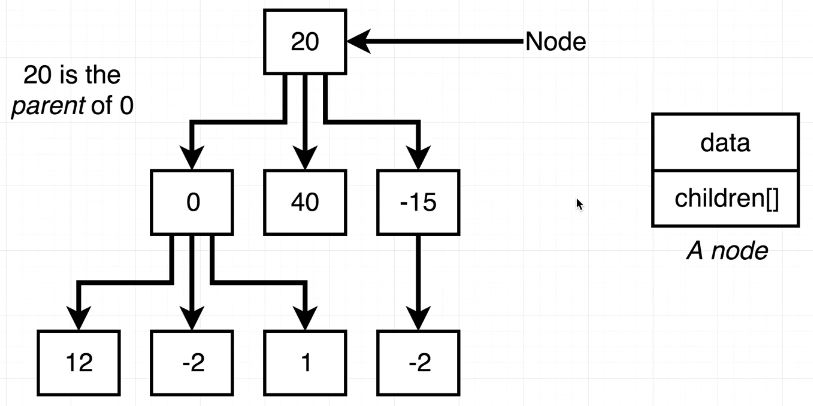
🎈 이진 트리(Binary Tree)란,
Node는 left, right 양쪽 2가지 Node만 가질 수 있으며
left는 해당 Node의 값보다 작아야하고, right는 해당 Node의 값보다 커야하는 구조를 갖는 Tree를 칭한다.

🧨constructor()는 data, left, right을 가져야할 것이고, 각 값의 초기 선언을 어떻게 해야할 지 생각해보면 된다.

insert() method를 작성하기 위해서는
검색이 필요하기 때문에 재귀(recursion)을 사용해야 한다는 것, 조건문을 잘 활용해야 한다는 것
위 2가지를 명심하고 작성해 나가면 된다.

contains() method도 insert()와 비슷한 구조로 작성되지만, 값을 return해야 한다는 것을 명심하면 된다.

Binary Tree Search의 insert() 이미지화

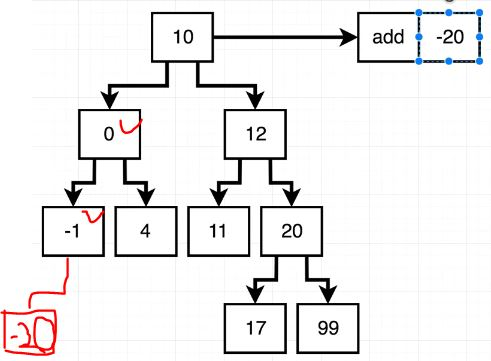
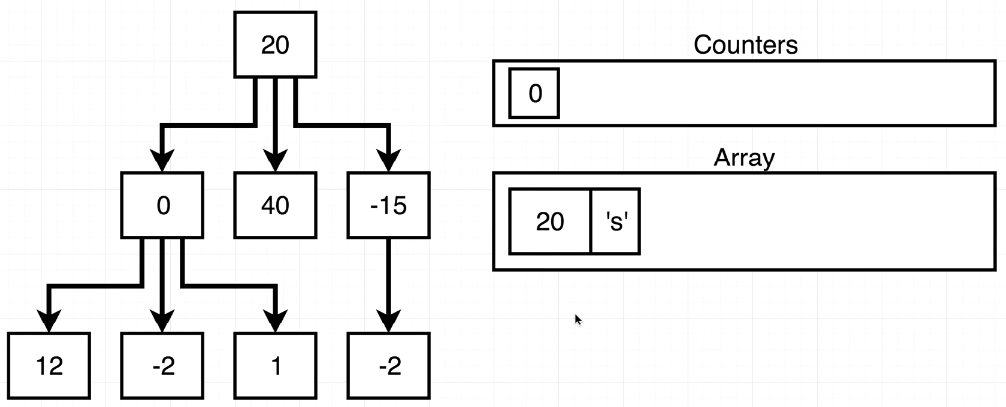
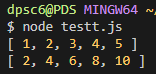
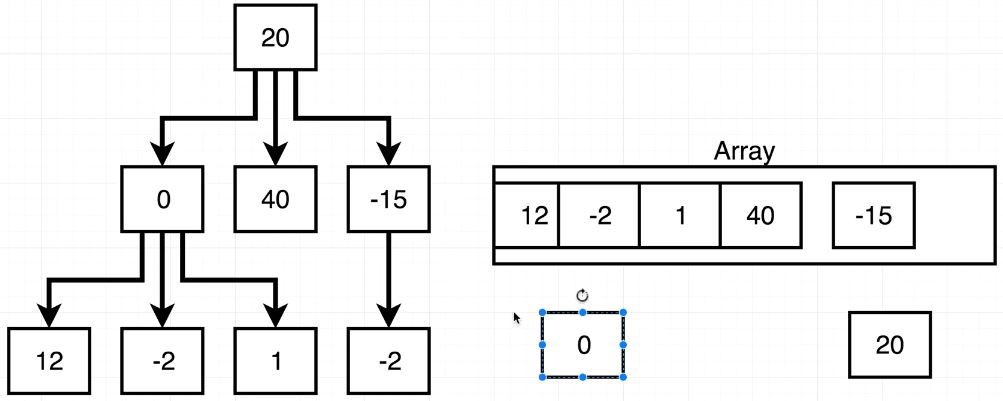
insert() method 작성에 도움이 될 만 한 이미지

Binary Search Tree의 contains() 이미지화

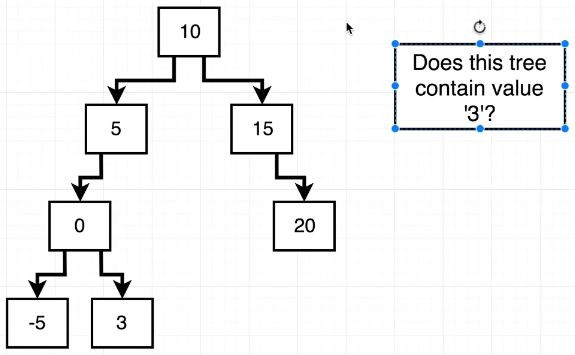
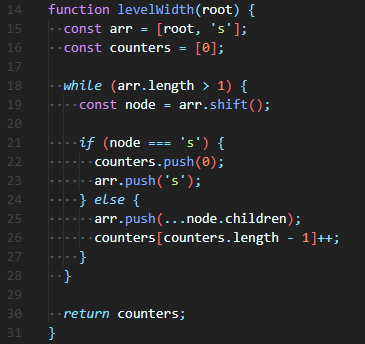
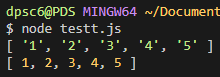
contains() method 작성에 도움이 될 만 한 이미지

Binary Search Tree Algorithm 정답 코드

🔮 constructor()는 간단하다.

constructor(data){
this.data = data;
this.left = null;
this.right = null;}
위와 같이 작성해주면 된다.

insert() method를 작성해보자

들어오는 data가 this.data보다 작다면? 왼쪽
들어오는 data가 this.data보다 크다면? 오른쪽
왼쪽 또는 오른쪽에 Node가 있나? 있다면 재귀 insert(data)
왼쪽 또는 오른쪽에 Node가 없나? 없다면 new Node(data)
이 조건문만 잘 작성해주면 되고, 다시 검색이 필요할 때는 left or right의 insert()를 재귀로 call해주면 된다.
재귀로 다시 탐색할 때는, 한 단계 아래 tree로 이동한다는 걸 명심하자.

contains() method를 작성해보자

들어오는 data가 this.data와 같은가? 해당 Node return
들어오는 data가 this.data와 작은가? 작다면 재귀 contains(data)
들어오는 data가 this.data와 큰가? 크다면 재귀 contains(data)
들어오는 data가 this.data와 일치하는게 없다? 없다면 null return
위의 조건문을 잘 작성해주면 된다.

📌이때 명심해야할 것은, contains()에서는 조건문에 return이 필요하다는 것이다.
해당 Node를 찾거나 못 찾아도 값을 return해야하기 때문이다.
재귀를 사용하면 memory stack에 이전에 불러왔던 function이 쌓인다. 그리고 가장 나중에 진행한 function이 끝나면
마지막 function을 call한 function으로 돌아가서 작업을 마무리하게 된다.
따라서, return을 해주지 않으면, 해당 값을 끝까지 계속 지니면서 가져오지 못 한다.

insert()의 경우에는 return하는 값이 없기 때문에 return이 필요하지 않다.
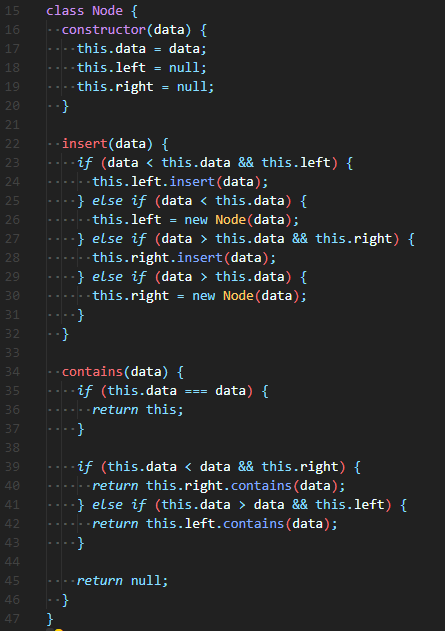
Full Code

class Node {
constructor(data) {
this.data = data;
this.left = null;
this.right = null;
}
 
insert(data) {
if (data < this.data && this.left) {
this.left.insert(data);
} else if (data < this.data) {
this.left = new Node(data);
} else if (data > this.data && this.right) {
this.right.insert(data);
} else if (data > this.data) {
this.right = new Node(data);
}
}
 
contains(data) {
if (this.data === data) {
return this;
}
 
if (this.data < data && this.right) {
return this.right.contains(data);
} else if (this.data > data && this.left) {
return this.left.contains(data);
}
 
return null;
}
}
728x90

Q. 입력 받은 Tree의 root를 이용해 Tree 각 층의 Node 너비(=개수)를 알아내는 function 작성하라.

--- Example
Given:
0
  / |  \ 
1   2   3
|       |
4       5

Answer: [1, 3, 2]

🎈 Tree traverseBF(BFS) method와 비슷하다.
배열을 선언해 초기 값으로 root와 각 층의 끝을 알려주는 문자('s')를 넣어주고, 이런 형식으로 반복 해주면 된다.
또한, 이 과정에서 각 층의 Node를 count해줘야 한다.

Tree Level Width Algorithm의 이미지화

🧨 위의 이미지를 보며 어떻게 풀어나갈 지 생각해보자

1. []의 초기값 선언
2. while 조건문은 어떻게?
3. while 내부에서 's'처리는 어떻게?
4. count 방식은 어떻게?

위 4가지만 잘 생각해주면 문제는 생각보다 쉽게 해결된다.

Tree Level Width Algorithm 정답 코드

🔮 arr 배열에 [ root, 's' ]를 넣어주고 시작해야 한다. while 조건문으로 arr.length > 1을 줄 것이기 때문이다.
위와 같이 조건문을 작성하면, 마지막 's'가 남았을 때 while을 끝낼 수 있다.
여기서 counters 배열에 0을 넣고 시작하는 것도 중요한 팁이다.
보통 counter를 한다고 생각하면, count변수를 따로 만들어 count++를하고 반환할 결과 배열에 push(count)할 것이다.
하지만, 방금 작성한 방법을 사용하면 위의 while에서는 마지막 count를 결과 배열에 push하지 못한다.

전 글의 Tree traverseBF(orDF) method에서 했던 것처럼, arr.shift()을 해서 가장 첫 번째 index 값을 가져온다.
만약 's'면, 해당 width count는 끝났으며, 다음 level의 children이 모두 arr에 push된 것이므로,
새로운 counters를 push해줌과 동시에 해당 width의 끝을 알리는 's'도 push해준다.
's'가 아니라면, 위와 반대로 해당 level을 count하고 있으며, 다음 level의 children을 push하고 있는 것이므로
arr.pushcounters++를 진행해준다.

Full Code

function levelWidth(root) {
const arr = [root, 's'];
const counters = [0];
 
while (arr.length > 1) {
const node = arr.shift();
 
if (node === 's') {
counters.push(0);
arr.push('s');
} else {
arr.push(...node.children);
counters[counters.length - 1]++;
}
}
 
return counters;
}
728x90

✨ 내가 제공한 function통과(pass)하는 값(element)들을 새로운 배열로 만들어주는 helper method

💻Example Code

ex1)
const originArr = [ 1, 2, 3, 4, 5 ];
const passedArr = originArr.filter( num => num !== 3 );

console.log(originArr);
console.log(passedArr);

실행 결과(3이 없어진 배열이 새로 생긴 것을 볼 수 있다)

ex2)
const originArr = [ 'a', 'b', 'c', 'd', 'e' ];
const passedArr = originArr.filter( char => char !== 'a' );

console.log(originArr);
console.log(passedArr);

실행 결과('a'가 제거된 것을 볼 수 있다)

😋 배열에서 내가 원하지 않는 값을 제거하고(솎아내고) 새로운 배열을 생성한다.
map()과 마찬가지로 정말 정말 많이 쓰인다. 꼭 알아둬야할 helper다.

👉 자세한 내용은 https://developer.mozilla.org/en-US/docs/Web/JavaScript/Reference/Global_Objects/Array/filter


Array.prototype.filter()

The filter() method creates a new array with all elements that pass the test implemented by the provided function.

developer.mozilla.org


'JavaScript > Built-in Method etc.' 카테고리의 다른 글

Math.random()  (0) 2020.01.18
Math.ceil()  (0) 2020.01.18
Array.prototype.map()  (0) 2020.01.11
Array.prototype.push()  (0) 2020.01.06
Array.prototype.pop()  (0) 2020.01.04
728x90

기존 배열(array)에 어떠한 function(연산)을 적용한 후 새로운 array를 만들고 싶을 때 사용하는 helper method
(for loop같은 반복문을 이용하고 싶지 않을 때)

💻Example Code

ex1)
const originArr = [ 1, 2, 3, 4, 5 ];
const populatedArr = originArr.map( num => num * 2 );

console.log(originArr);
console.log(populatedArr);

실행 결과(기존 array는 그대로 있다)

ex2)

const originArr = [ '1', '2', '3', '4', '5' ];
const populatedArr = originArr.map( charNum => Number(charNum) );

console.log(originArr);
console.log(populatedArr);

실행 결과(String이 Number로 변경된 것을 볼 수 있다)

😋 map()의 괄호 안에 내가 원하는 function을 넣고, 기존 array에 있는 모든 값(element)를 불러와 실행시킨다.
굉장히 자주 쓰이는 helper method로써 꼭 알아둬야할 helper다. ex2)와 같이 String -> Number로 변경시키고 싶을 때도 자주 사용한다.

👉 자세한 내용은 https://developer.mozilla.org/en-US/docs/Web/JavaScript/Reference/Global_Objects/Array/map


Array.prototype.map()

The map() method creates a new array populated with the results of calling a provided function on every element in the calling array.

developer.mozilla.org


'JavaScript > Built-in Method etc.' 카테고리의 다른 글

Math.ceil()  (0) 2020.01.18
Array.prototype.filter()  (0) 2020.01.11
Array.prototype.push()  (0) 2020.01.06
Array.prototype.pop()  (0) 2020.01.04
Array.prototype.unshift()  (0) 2020.01.04
728x90

https://www.acmicpc.net/problem/2839

Code

최종 제출 답안

😢 이런저런 조건들을 떠올리다보니 산으로 갔던 문제
역시 조건 그대로 코드를 작성하기 보다는, 다른 시각으로 바라보는 조건이 핵심

😊 가장 최고의 조건을 걸어두고 하나씩 물러나며 최선의 조건을 찾아야한다.

최종 제출 답안)

bigMax 변수에 가장 큰 봉지인 BIG(5)으로 설탕 무게를 나눴을 때, 나오는 숫자를 저장한다.
그리고 bigMax가 음수로 떨어지지 않을 때까지 while loop을 열어준다.

임시로 만든 tempSugar 변수에는 앞에서 계산한 bigMax 무게만큼 SUGAR를 빼준다.
만약 tempSugar가 작은 봉지인 SMALL(3)으로 나눴을 때 나머지가 없다면 최선의 조건이기 때문에 출력하고 계산을 끝내준다.
하지만, 만약 조건에 맞지 않는다면 bigMax를 1만큼 빼준다.
그런 후 tempSugar의 크기를 5만큼 높여주고 다시 3으로 나눠본다.

이런식으로 계속 반복하며 다시 5씩 늘려보고 다시 3으로 나눠봤을 때 나머지가 0이라면 계산이 가능한 설탕 무게이고,
그렇지 않고 bigMax가 음수로 떨어진다면 그건 계산할 수 없는 설탕 무게이므로 -1을 출력한다.

다른 정답자들 중에 배울 수 있었던 답안)

다른 정답자의 답안

😊 먼저, SMALL(3)의 개수를 담아두기 위한 bags 변수를 선언해준다. while loop을 무한으로 돌리면서,
설탕을 BIG(5)으로 나눴을 때 나머지가 0이라면 BIG으로 나눈 값과 bags를 합쳐 출력한다.
그리고 만약 SUGAR가 0이하로 떨어지면 -1을 출력해준다.
둘 다 해당되지 않으면 설탕을 SMALL(3)만큼 빼주고, bags를 1 증가시켜준다. (설탕을 3으로 나눈 것과 같은 의미)

즉, 이것도 역시 최고의 방법인 5를 우선으로 나눠주고, 그게 되지 않는다면 3을 하나씩 늘려가는 방법으로 해결했다.
이것도 굉장히 훌륭한 방법이라고 생각한다.


Full Code (https://github.com/DasolPark/Algorithm_JavaScript/tree/master/Baekjoon)

// Sugar Delivery
 
// 3rd Solution - Good
 
// For submit
 
// const fs = require('fs');
// let SUGAR = Number(fs.readFileSync('/dev/stdin'));
 
let SUGAR = 11; // 18 4 6 9 11
const BIG = 5;
const SMALL = 3;
 
let bigMax = Math.floor(SUGAR / BIG);
while (bigMax >= 0) {
let tempSugar = SUGAR - bigMax * BIG;
if (tempSugar % SMALL === 0) {
console.log(bigMax + tempSugar / SMALL);
return;
} else {
bigMax--;
}
}
console.log(-1);
 
// 1st Solution
 
// For submit
 
// const fs = require('fs');
// const SUGAR = parseInt(fs.readFileSync('/dev/stdin').toString().trim());
 
// For local test
// const SUGAR = 18; // 18 4 6 9 11
// const BIG = 5;
// const SMALL = 3;
 
// if (SUGAR >= SMALL) {
// let bigMax = Math.floor(SUGAR / BIG);
// if (bigMax <= 0) {
// if (SUGAR % SMALL === 0) {
// console.log(SUGAR / SMALL);
// return;
// } else {
// console.log(-1);
// return;
// }
// } else {
// while (bigMax >= 0) {
// let tempSugar = SUGAR - bigMax * BIG;
// if (tempSugar % SMALL === 0) {
// console.log(bigMax + tempSugar / SMALL);
// return;
// } else {
// bigMax--;
// }
// }
// console.log(-1);
// }
// } else {
// console.log(-1);
// }
 
// 2nd(other solution) - Good
 
// For submit
 
// const fs = require('fs');
// let SUGAR = parseInt(fs.readFileSync('/dev/stdin').toString().trim());
 
// For local test
// let SUGAR = 9; // 18 4 6 9 11
// let bags = 0;
 
// while (true) {
// if (SUGAR % 5 === 0) {
// console.log(SUGAR / 5 + bags);
// break;
// } else if (SUGAR <= 0) {
// console.log(-1);
// break;
// }
// SUGAR = SUGAR - 3;
// bags++;
// }
728x90

여러 이름으로 불리는 Hash 관련 자료구조에 대해 잘 정리해놓은 블로그를 찾아서 이렇게 포스팅한다.

Hash Example

학부때 배웠던 Hash Table에 대한 기억을 끄집어 내고자 검색을 하였고, 
지금 메인으로 사용하는 JavaScript를 더욱 잘 이해하기 위해 아래 내용을 학습하면 더 좋을 것 같았다.

즉, JavaScript의 Object( {} )를 해쉬라고 보면 된다.
key와 value로 구성되어 있어서 찾을 key를 모른다면 순차적으로 검색하는 O(n) 시간복잡도가 되지만,
key를 미리 안다면 바로 직접 item에 접근할 수 있는 O(1)의 빠른 시간복잡도를 갖는 다는게 장점이다.

JavaScript에서는 fibonacci 알고리즘을 풀면서 사용해봤다.
그냥 반복문을 돌려서 문제를 풀 수도 있지만, 매우 큰 수는 시간이 오래 걸리기 때문에 시간 복잡도 때문에 캐시를 사용하면 좋다.
따라서 fibonacci를 풀기 위해 재귀함수를 사용하였고, 재귀를 사용할 때마다 계산하여 나온 결과를 cache object에 저장하였다.
그리고 해당 값이 cache에 존재한다면 값을 다시 계산하지 않고 cache에서 가져다 쓸 수 있게 작성하였다.
이 방법은 크게 다이나믹 프로그래밍(Dynamic Programing)이라고 부르며, 정확하게는 memoize라고 부른다.

👍 출처 https://jwo0816.blog.me/221457342364


[알고리즘 끄적끄적 04] Hasing / Hash Table / 해싱 / 해시 테이블

Hashing / Hash Table​해시 테이블 (Hash table) 이란, [키(Key)와 값(Value)]이 하나의 쌍을 이루...

blog.naver.com


728x90

Array의 정의(Definition of Array)

Array는 순차적인 item의 집합이다. 또한, Array는 해당 item마다 index를 갖는다.

Array의 이미지화


List의 정의(Definition of List)

List는 순차적으로 정렬된 item(=node)의 집합이다. List는 index를 갖지 않는다.

List의 이미지화


👓 Array와 List의 차이

1. Item에 직접(direct) 또는 순차적(sequential)으로 접근할 수 있느냐?

Array는 직접적 또는 순차적 방법으로 모두 item에 접근할 수 있지만,
List는 순차적으로 접근하는 것만 가능하다.
List는 memory에 저장되기 때문이다.

2. List는 index가 없다.

1번과 비슷한 말이지만, 조금 더 설명하기 위해 2번을 추가하였다.
List는 index가 없다. 왜냐하면 Array의 item들처럼 꼭 바로 옆에 item을 할당할 필요가 없기 때문이다.
List의 Node(item)은 다음 값을 가리키는 주소(pointer)를 가지고 있기 때문에 memory의 어느 위치에 있어도 상관 없다.

여러 글을 읽어보았지만, 아래 출처 내용에 동의한다. 그리고 다른 의견도 많지만, 간단히 글을 작성해본다. (사실 번역이다)
List의 대표적 예인 Linked List가 궁금하다면 JavaScript - Data Structure 카테고리를 참고하길 바란다.

👍 출처 https://www.quora.com/What-is-the-difference-between-an-ARRAY-and-a-LIST


What is the difference between an ARRAY and a LIST?

Answer (1 of 17): Arrays > An array is an ordered collection of items, where each item inside the array has an index. Taking the one dimensional array one step further, we can have arrays with two (or even more) dimensions. Lists > It’s a collection of ite

www.quora.com


728x90

트리의 정의(Definition of Tree)

트리의 정의(Definition of Tree)

🎈 위 그림에서 볼 수 있듯, Tree는 최상위에 root를 가지며, 각 Nodedata와 children을 가지고 있다.
root는 최상위 위치이기 때문에, 그 위에는 어떤 것도 존재할 수 없다.
나무의 뿌리 또는 뿌리를 제외한 나무를 뒤집어 놓았다고 상상하면 된다.

Tree는 기본적으로 추가( add() ), 삭제( remove() ) 기능을 사용하여 다루는데, 이 method는 Node class가 갖도록 작성하겠으며,
Tree class 내에서는 탐색 기능인 traverseDF(), traverseBF() method를 작성해보겠다.
(DFS - Depth First Search, BFS - Breadth First Search)

JavaScriptclass를 이용하여 Tree를 만들어 보자.

Node class를 먼저 작성해보겠다.

 Node class

😐 지금까지 해온 것처럼, 생성자(constructor)를 이용하여 기본 변수를 선언해준다.
this.data는 data를 저장하기 위한 변수, this.children은 아래 뿌리처럼 생겨날 새로운 노드를 위한 변수다.

add()는 아래 위치로 새로운 Node를 생성해준다. this.children이 배열(array)를 갖기 때문에 push를 이용해 간단히 추가해준다.

remove()입력 받은 값(data)과 똑같은 값(data) Node를 제거해준다.
Array.prototype.filter()를 이용해서 입력 받은 값(data)과 같지 않은 값(data)만 다시 this.children으로 재할당 해준다.

Tree class

😐 앞에서 언급했던 것처럼, Tree는 Root를 반드시 가져야 한다. 따라서 생성자(constructor)를 이용해 root를 선언해준다.

먼저, traverseBF() flow 이미지를 보고 코드를 설명해 보겠다.

Breadth-First Traversal

traverseBF()너비 우선 탐색이다.
root에서부터 시작하여 한 단계씩 아래 위치(층이라고 생각하면 쉽다)로 이동하여 Node를 탐색한다.

traverseBF()의 이미지화

위의 이미지를 이용해 이해하면 조금 더 쉽다.
그림의 오른쪽에 Array처럼 배열을 만들어주고, 가장 먼저 this.root를 넣어준다.(Array는 탐색 순서)

그리고 while loop을 이용해 Tree를 모두 탐색하고 array가 빌(empty) 때까지 반복해주면 된다.
fn은 const letters = []; traverseBF(node => letters.push(node.data);)처럼 letters에 검색한 모든 data를 넣어주는
function이다.
arr에 children을 넣을 때, ES2015 Spread를 이용하면 편하지만, for ... of를 이용해도 된다.

다음은 traverseDF()다. 먼저, traverseDF flow 이미지를 보고, 코드를 설명해 보겠다.

Depth First Search

TraverseDF()깊이 우선 탐색이다.
root에서부터 시작하여 가장 깊은 곳(가장 아래 단계) 먼저 탐색하는 알고리즘이다.
그림에서처럼 20 -> 0 -> 12 -> -2 -> 1 ... 순서대로 깊이 위치해 있는 Node부터 탐색한다.

traverseDF()의 이미지화

traverseBF()와 마찬가지로 Array를 만들어서 탐색한 Node를 순서대로 넣어준다.
20 이후에 0, 40, -15 를 갖는 Node가 Array에 들어가지만, 0의 자식 Node가 또 존재하므로, Array의 앞쪽에 Node를 넣어준다.
이 기능은 Array.prototype.unshift()를 이용해주면, Array의 가장 앞에 Node를 넣어줄 수 있다.
그리고 fn(node)를 이용해 모든 노드의 data를 letters에 저장해준다.

결과적으로,
traverseBF()의 letters에는 [ 20, 0, 40, -15, 12, -2, 1, -2 ] 가 들어가 있을 것이고,
traverseDF()의 letters에는 [ 20, 0, 12, -2, 1, 40, -15, 2 ] 가 들어가 있을 것이다.

위와 같이 TreeDFS, BFS를 작성해보았다.

다음 글에서는 Tree와 관련된 알고리즘(Level Width, Validate, Binary Search Tree)를 작성해보겠다.

Full Code

class Node {
constructor(data) {
this.data = data;
this.children = [];
}
 
add(data) {
this.children.push(new Node(data));
}
 
remove(data) {
this.children = this.children.filter(node => {
return node.data !== data;
});
}
}
 
class Tree {
constructor() {
this.root = null;
}
 
traverseBF(fn) {
const arr = [this.root];
while (arr.length) {
const node = arr.shift();
 
arr.push(...node.children);
fn(node);
}
}
 
traverseDF(fn) {
const arr = [this.root];
while (arr.length) {
const node = arr.shift();
 
arr.unshift(...node.children);
fn(node);
}
}
}
728x90

https://www.acmicpc.net/problem/1712

Code

https://github.com/DasolPark/Algorithm_JavaScript/blob/37d399b654275b31f94815eb86c2853ec8cc5b1b/Baekjoon/1712.js

😢 21억 조건을 못 보고 반복문을 돌려 counter를 하나씩 증가시키려고 했다.. 잘못된 방법!

😊 역시나 수학 카테고리답게 다항식을 이용해서 풀면 쉽게 풀 수 있다.
A는 고정 비용, B는 가변 비용, C는 판매 가격이다.
판매 누적 금액고정비용+가변 누적 비용을 넘어서면 손익분기점을 넘어간다.
식을 만들어 본다면, A + Bx < Cx로 만들 수 있다. 
식을 정리해보자. A < Cx - Bx로 Bx를 넘겨주고, A < (C-B)x 로 정리해주면 조금 더 보기 쉽다.
즉, C-B가 0이하(즉, 0 또는 음수)로 떨어지면 손익분기점은 없다. 계속 적자다..ㅎㅎ

손익분기점이 없어서 '-1'을 출력하는 조건문은 2가지 정도로 표현할 수 있다.
1. if(C-B <= 0) { console.log(-1); }
A < (C-B)x 식을 생각해서 C-B가 0이하면 손익분기점은 없다고 표현할 수 있다.
2. if(C <= B) { console.log(-1); }
C-B > 0이 돼야하므로, C <= B으로 정리해주면 손익분기점이 없다고 표현할 수 있다.

Full Code

// Break-Even Point
 
// 1st Solution(other)
 
// For submit
 
// const fs = require('fs');
// const input = fs.readFileSync('/dev/stdin').toString().trim().split(' ');
 
// For local test
const input = ['1000', '70', '170'];
const A = parseInt(input.shift());
const B = parseInt(input.shift());
const C = parseInt(input.shift());
const netProfit = C - B;
 
if (netProfit <= 0) {
console.log(-1);
} else {
console.log(Math.floor(A / netProfit) + 1);
}
 
// 2nd Solution(ohter)
 
// For submit
 
// const fs = require('fs');
// const input = fs.readFileSync('/dev/stdin').toString().trim().split(' ').map(num => parseInt(num));
 
// For local test
// const input = ['1000', '70', '170'].map(num => parseInt(num));
// const A = input.shift();
// const B = input.shift();
// const C = input.shift();
 
// if (C <= B) {
// console.log(-1);
// } else {
// console.log(Math.floor(A / (C - B)) + 1);
// }
728x90

https://www.acmicpc.net/problem/1316

Code

https://github.com/DasolPark/Algorithm_JavaScript/blob/a283e8643975b13a658de279d66a7d2f989d9cab/Baekjoon/1316.js

😢 간단한 문제지만, 어떻게 하면 효율적으로 풀 수 있을까 고민했던 문제. 결과적으로 그다지 효과적이지 않은..

😊 결국 중첩 for loop을 이용해서 각 word의 문자를 체크하는 방법으로 풀었다.
Object를 하나 만들어주고, 해당 문자가 이미 사용되었다면 charMap에 '문자': true로 넣어주었다.
만약 charMap에 이미 해당 문자가 있다면 해당 word의 index-1과 같은지 비교해주었다.
같다면 그룹단어, 그렇지 않다면 더 이상 검사할 필요가 없기 때문에 counter를 감소시켜주고, break으로 내부 for loop을 끝냈다.

다른 정답자들의 풀이도 좋은 소스가 되었다.

Full Code

// Group Word Checker
 
// 3rd Solution
 
// For submit
 
// const fs = require('fs');
// const input = fs.readFileSync('/dev/stdin').toString().trim().split('\n');
 
// For local test
// const input = ['3', 'happy', 'new', 'year'];
const input = ['4', 'aba', 'abab', 'abcabc', 'a'];
const N = parseInt(input.shift());
let counter = N;
 
for (let i = 0; i < N; i++) {
const charMap = {};
for (let j = 0; j < input[i].length; j++) {
if (!charMap[input[i][j]]) {
charMap[input[i][j]] = true;
} else if (input[i][j] !== input[i][j - 1]) {
counter--;
break;
}
}
}
 
console.log(counter);
 
// 1st Solution
 
// For submit
 
// const fs = require('fs');
// const input = fs.readFileSync('/dev/stdin').toString().trim().split('\n');
 
// For local test
// const input = ['3', 'happy', 'new', 'year'];
// const input = ['4', 'aba', 'abab', 'abcabc', 'a'];
// const N = parseInt(input[0]);
// let counter = N;
 
// for (let i = 1; i <= N; i++) {
// const charMap = {};
// for (let j = 0; j < input[i].length; j++) {
// if (!charMap[input[i][j]]) {
// charMap[input[i][j]] = true;
// } else if (charMap[input[i][j]] && input[i][j - 1] === input[i][j]) {
// continue;
// } else {
// counter--;
// break;
// }
// }
// }
// console.log(counter);
 
// 2nd solution(other)
 
// For submit
 
// const fs = require('fs');
// const input = fs.readFileSync('/dev/stdin').toString().trim().split('\n');
 
// For local test
// const input = ['3', 'happy', 'new', 'year'];
// const input = ['4', 'aba', 'abab', 'abcabc', 'a'];
// const N = parseInt(input.shift());
// let counter = 0;
 
// function checkGroupWord(str) {
// const checker = [];
 
// for (let i = 0; i < str.length; i++) {
// if (checker.indexOf(str[i]) === -1) {
// checker.push(str[i]);
// } else {
// if (checker[checker.length - 1] !== str[i]) {
// return;
// }
// }
// }
// counter++;
// }
 
// for (let i = 0; i < N; i++) {
// checkGroupWord(input[i]);
// }
 
// console.log(counter);

+ Recent posts